As the White Sox team photographer, one of my most important responsibilities is taking the annual team photo. Since there are hours of preparation involved for what turns out to amount to mere minutes of actual shooting time, I thought I’d share my set-up and lighting techniques for those photographers considering taking on the task of shooting a team or large group photo.

Our team photo includes not only the players and coaching staff, but the field and medical staff as well. Typically, we end up with 45-48 people in the photo. The placement of who goes where is determined primarily by seniority and height. I try to place veteran players such as White Sox captain Paul Konerko, Mark Buehrle, Omar Vizquel and Andruw Jones either toward the center of the photo or on what I will call the bookends. So my first step is to take care of putting together the seating chart.

Determining riser height is very important. Should the height difference between the ground, first riser and second riser be too small, shadows from the players in one row can fall on the faces of the players in the row behind. There needs to be adequate separation between rows to ensure that any shadow falls below face level. The riser heights I found to work the best are 16 and 34 inches. No shadow issues with nice separation. I utilize five rows for our team photo. The first row is made up of bat boys sitting on the ground, the second row consists of coaching and field staff personal sitting on folding chairs, the third row is made up of players and staff standing at ground level, while rows four and five are made up of players standing on risers.

Every team has a certain look or stadium landmark that is considered when selecting the location for the team photo. For the White Sox, our exploding scoreboard has been a symbol synonymous with White Sox baseball since its inception by Bill Veeck as a part of old Comiskey Park back in 1959. This tradition was carried over to U.S. Cellular Field, so we incorporate the exploding scoreboard as the background for our team picture.
I schedule the shoot to begin prior to the start of batting practice, but the exact time is determined based on the date. The timing is critical in late summer or early fall since the sun begins traveling southbound at an accelerated rate as summer wanes. A two week swing in shooting dates can result in a dramatic change in shadow placement on the field (the light towers and upper deck shadow). You can actually see the shadow moving if watched closely. Fortunately, the team and staff are extremely prompt and always show up right on time. During late August, our shoot time is 3:45pm. By the middle of September, a 3:30pm shoot time is cutting it close when trying to beat the racing shadow! Minutes matter.

I always hope for a nice sunny day, and I’ve been fortunate over the past 12 years to have sunny weather on team photo day. But that doesn’t mean every scheduled day for the team photo was sunny and nice. I have experienced years when we’ve had to postpone the team photo three or four times! One year, I made the photo during the last week of the season after four postponements. Although occasionally the postponement is due to scheduling conflicts, more often it’s due to Mother Nature dealing her typical summertime wrath on the Chicago area.
The natural light falling on the team in late August is slightly front and cross lit, so filling in shadows without blowing out highlights is my challenge. My experience is that if I dial in my fill light exposure to fall about 2/3 to 3/4 of a stop less than ambient, the look is clean and shadows adequately filled. For lighting, I use Calumet Elite II strobes, utilizing two 2400w power packs and four heads with standard reflectors while using Calumet Lite-Link wireless transceivers. I place two heads and one pack on each side of the risers, with one head slightly above and behind the other.
My goal is to cover the entire shooting area, which is approximately 24 feet across by 9 feet deep, with a minimal shift in light coverage. Since there are some players closer to the fill light source than others, the trick is to feather the light and use the edges of the feather to light the corners closet to the source, which will therefore direct the center of the fill light source to land deeper into the set. Feathering both sides this way provides nice, even lighting with coverage over the entire set that differs by no more than three-tenths of a stop total over the entire area.

My camera and lens of choice for this project is a Nikon D3X and Nikkor AF-S 24-70 zoom. This camera and lens combination produces gorgeous files! They can be enlarged to enormous sizes with incredible quality. Before digital technology was where it is today, I shot the team photo on Fujichrome using a Hasselblad CM and 80mm lens, and then had the chrome subsequently drum scanned. It’s amazing what can be done in today’s new digital age, because when compared side-by-side, the Nikon D3X raw file blows the doors off of the medium format drum scanned chrome. By shooting RAW plus large JPG, we have the versatility to turn the JPG’s around quickly for social media, or process the RAW files for printing and other projects, such as posters. My actual settings for this year’s photo were 1/125 of a second at f18, ISO 200, with color balance set to a manual kelvin temperature of 5260k in Adobe 98 color space. I dial in the color temperature manually since I know my lights are balanced to that approximate temperature and daylight during that time of day is within a few hundred degrees as well. Everything can be tweaked in RAW mode anyway, but for the JPG’s taken right out of the camera, this combination looks great. I much prefer minimizing my variables by dialing in manual color temperatures instead of using auto white balance whenever possible.

Once the players are in position, it’s eyes to the camera and I fire on the count of three, hoping to minimize closed eyes. Experience has led me to believe that taking any more than nine or ten frames is futile, since players attention tends to diminish and eyes begin to wander the longer the shoot goes on. In my opinion, the first few frames are the most critical. This year was no exception. Frame number one was the keeper.

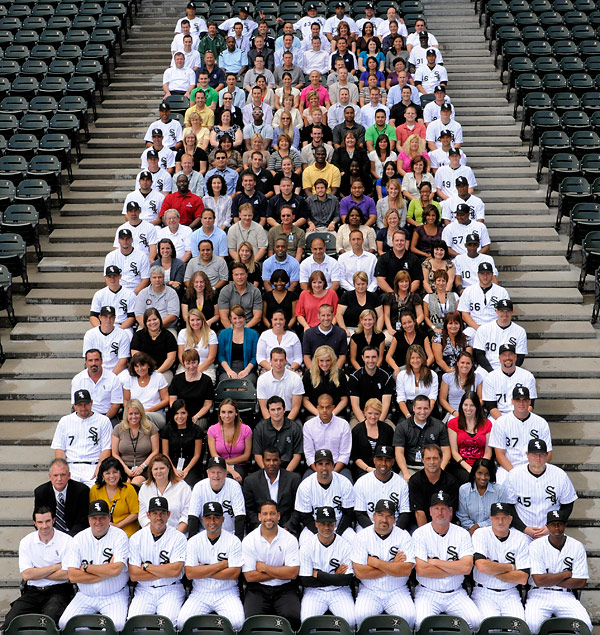
So nine frames into this year’s shoot, I called it a wrap. But we weren’t done. Another shot I accomplish on this day is a photo of the entire White Sox front office staff with the players, coaches and field staff. The White Sox family, if you will.

Since time is always on everyone’s mind, I had to come up with a way to make this photo quickly and look good. What I came up with was having the front office sit in the shaded portion of the stands, reserving the front row and one space on the end of each row for the players to sit in to help “frame” the front office staff, while I am lifted high overhead in a cherry picker (to minimize blocked faces) to make this photo. Lighting a group this large would be quite difficult, so I decided to shoot available light in open shade. Since I’m using a Nikon D3X camera, I’m able to bump up the ISO to 1000 without any loss of quality while at the same time allowing me to dial in adequate depth of field.

My final settings were 1/100 second at f18, ISO 1000. For this shot I did use auto white balance, since I did not use strobes and would rather let the camera calculate the color temperature instead of me guessing what it was. Since time is critical, I didn’t have a chance to test it. And there are usually a few tweaks I wish I would have made, such as filling an empty seat or two. But time isn’t always on my side.

After the dust settled and I was back in the office editing my take from the day, I looked at the image time stamps and discovered that I shot both the formal team photo and the front office/team photo in less than 4 minutes! Everyone was happy, especially the players, who honestly appreciate the speed in which I completed this project.
4 1/2 hours of set-up and planning for 4 minutes of shooting, and the results were worth every second. I can’t stress enough the need to have a plan in place before you shoot, especially when working with large groups. Taking the extra time beforehand will keep your clients happy in the end, hopefully for years to come.


